Showing posts with label New Blogger. Show all posts
Tuesday, August 28, 2007

Remove 'pencil' and 'screwdriver and wrench (spanner)' quick editing icons permanently

0 comments
Update: Now you can choose to hide or display the quick editing tool by going into Blogger edit post options but do read about why you should keep the quick editing tool before you remove them.

(If you only want to know how to permanently get rid of those quick editing icons, skip to Permanently get rid of pencil icon or Permanently get rid of screwdriver/wrench icon but I hope you will read the explanation on why you should not remove those useful icons)

Important note: those quick edit icons is really useful and only visible to you. My recommendation to you is not to remove them although many bloggers have asked how to remove/hide them


We have received numerous complaints of bloggers seeing those "irritating" quick editing icons - the pencil New Blogger quick edit pencil icon quick edit icon for the posts, and the screwdriver and wrench (spanner) New Blogger screwdriver and wrench quick edit icon quick editing icon for the Page Elements (widgets). Personally they don't irritate me at all.

To me, these are really useful features, especially if you put a lot of HTML/Javascript Page Elements and you don't type a title for the Page Element (which is the norm). In the LAYOUT, they will all read "HTML/Javascript" and there is no way for you to tell which HTML/Javascript is for what unless you click on EDIT to look at what is inside. On the other hand, if you are logged in and you go the the blog, you will know exactly which Page Element you want to edit/delete and all you have to do is to click the New Blogger screwdriver and wrench quick edit icon icon and you will be editing/deleting the Page Element you want to edit/delete.

Further, they are only visible to me when I am logged into Blogger. No one else will see it. I have written about it before at How to get rid of the irritating "pencil" and "screwdriver and wrench (spanner)" quick edit icons (click BACK button to get back to this page). This however don't seem to satisfy some bloggers, especially those who have private blogs and can view their blogs only when they are logged in.

Here is one comment from a particularly irritated blogger:

"Okay 300 ducats to cooked art, his method worked. The other anwers are basically saying, 'Don't worry -- nobody who uses your blog will see these eyesores but you.' Which seems like an odd thing to tell me, since I will be using my blog more than anyone else, and I don't actually enjoy looking at eyesores any more than they would."
OK, if getting rid permanently of those very useful quick edit icons is what you want, here is how you can do it:

Permanently get rid of quick editing Pencil icon for posts

Sign into Blogger (Dashboard), click SETTINGS for the relevant blog and you will be in the SETTINGS > BASIC sub-tab by default. Just a bit down from the top of the page, you will see "Show Quick Editing on your Blog?". Click the down arrow and select "No" At the bottom, click "Save Settings". (Warning: There is a button "Delete this blog" very near that "Save Settings" button, and it is not uncommon to hear of bloggers who accidentally deleted their blog this way). Once you have done that, you will never see the quick editing Pencil icon again.

Permanently get rid of quick edit screwdriver and wrench (spanner) icons for Page Elements (widgets)

Sign into Blogger (Dashboard). Click LAYOUT for the relevant blog. Click TEMPLATE tab, followed by EDIT HTML sub-tab. Before you do any editing of the template, backup the template PLUS the Page Elements. See Backup and edit New Blogger template PLUS backup Page Elements. Once you are done with that, you will still be in the template editor window. Tick the "Expand widget templates" box and wait for the template to fully expand. Then look for this line of code:

<b:include name='quickedit'/>

If you face difficulties finding that line of code, press ctrl+F and you will see a "Find" followed by a box for you to type or copy-paste what you want to find. Type or copy-paste the above line of code into the box and click "Next". The scroll bar will scroll down to the line and the line will be highlighted. Use your mouse to highlight that line of code again and press the DELETE key. Preview, and if you don't get any error message, click "Save Template". You will never see the "irritating" (to me, useful") screwdriver and wrench icons again.

Update: 25 May 2010: A commentator Susie Hovendick Chan said that she got rid of the quick edit icons by putting

quickedit:display none;

at the end of the style sheet, that is, just before ]]> thus ending with

quickedit:display none;
]]>

Update: A comment from a blogger which I myself haven't tested. Updating here in case any visitor interested in what he has to say. If you do try it, do give us some feedback by leaving a comment: "Sweet! I realized that the wrench icon was causing layout problems in IE7; I got rid following your instructions of it even though its pretty useful.

In case if this helps anyone: the wrench icon is floated right. Float right inside divs that are already right floated will cause the div to stretch unnecessarily in IE7."
Continue reading →
Saturday, June 2, 2007
0 comments
I have previously testing putting a clickable image to the post title, a report and the instruction of how to do it you can find at Testing putting a clickable image in post title.

I have repeated it here in this post. Click on the image to take you to the Blogger online book (in progress). I have tried to make clicking the title image open in new window and/or adding some text after the image, but apparently New Blogger limit the character length of what you can put in the post title.

BTW, I generated the button you see in the post title with a free button generator and the condition for using their services is that you have to post a clickable icon that leads to their site. Click on it if you want to generate your own buttons.

ButtonGenerator.com
Continue reading →
Tuesday, April 24, 2007

3 column New Blogger templates by Thur

0 comments
NOTE: Before you edit or change template, make sure you backup your curremt template PLUS Page Elements. Refer to Backing up current template PLUS Page Elements before changing new template

Thur has created 2 3-column New Blogger templates. One is a fixed width template and one a fluid width template. I will explain later, and also how you can observe the difference.

DownRight v3.0 3 column New Blogger template with all columns fixed

One is the DownRight v3.0 3-column, all columns fixed, width 960px template. You can see an example blog using this template at Articles on Fitness. If you are viewing the blog with a wide screen (most popular is 1024 X 768 screen resolution), you will see the contents fill the whole width of the screen. A visitor with a smaller screen (800 x 600) will see only part of the content and a horizontal scrollbar at the bottom of the screen. To see the rest of the right side of the content, he will have to scroll there. If you are using a large screen, and you will like to observe how the small screen visitor view it, type or copy-paste

javascript:top.resizeTo(800,600)

into the address bar and press the ENTER key. The window will resize to 800 x 600.

I hope you have a traffic counter installed for your template. It can give information about your visitors - from where they come from, what browser or Operating System they are using, if they got to your site, what search terms they used to find your site, the most popular pages, WHAT SCREEN RESOLUTION they are using. If a large percentage are 800x600, you may not like this template because part of your page will be hidden, and to see them, your visitors will have to scroll horizontally. Surfers are often lazy. Unless they are seriously interested in a site, if they don't see the hidden parts, they may not bother and surf over to other sites. This is the reason I use this Hackosphere 3 column New Blogger Minima template as 5-20% of this blog visitors are still using the 800x600 screen, and I don't want to discourage them from coming back. If you are reading this blog, you will probably see white spaces on both side, but not for 800x600 visitors who will find the content fit into their screen just nicely. Further there is this readability study mentioned in this post What is the best template for a blog (click BACK button to get back to this page), which says content corresponding roughly to the width are found to be more readable than wide column.

If you are interested in installing such traffic counter like the one I used and which give me the kind of statistics I want without too much information, try Statcounter. Others use Google analytics which provide a lot of information including many pie charts which I found too much. But I think analytics would be good for those in e-Commerce an using AdWord for their advertising campaign.

If you want Thur's DownRight v3.0 template, you can get it at DownRight v3.0 xml template.

Backing up and changing the template

It is always wise to backup your current template before you edit or change template. Refer to Backing up and changing New Blogger template. Blogger do not backup all Page Elements (widget) and it is likely when you try to save the new template, you will receive the warning "Such and such will be deleted". If not already mentioned in the above post, let me repeat it will be a good idea to edit your Page Element one-by-one, copy the content of the Page Elements into Notepad files and save them. Then when you have changed to the new template, you can put back easily whatever is missing.

It will be good if you have a browser with tabbed browsing like FireFox, then you can be in the Blogger page in one tab and in Thur's template page in another. First you will have to copy Thur's template at the download page (click on the page, press ctrl+A to highlight all the template, right-click and select "copy" to save it into clipboard.

To change to the new template, sign into Blogger Dashboard, and in the list of blogs, click LAYOUT in the section for the relevant blog, then click the EDIT HTML sub-tab. This will open the template editor. Click inside the template editor window to highlight all the current template, press the "Delete" button. Then right-click inside the now empty template editor window, chose "Paste to paste what you have copied into clipboard from above into the template editor window. Preview, and if satisfied, click "Save template".

Thur's DownRight v1.4 3 column fluid width New Blogger template

Another template is DownRight v1.4 3-column, main fluid, sidebars fixed template. You can see an example blog using this template at Weight Control Tips. Again, if you are using the wide screen, you will see the whole width of the content. A visitor with a small screen (800 x 600) will also see the whole width of the content, but with the main column squeezed into a narrow column. If you are using a wide screen and want to observe this, type or copy-paste

javascript:top.resizeTo(800,600)

into the address bar and press the ENTER key.

Fluid width template has the advantage of the page automatically adjusting to a visitor's screen resolution, but you have to be careful when putting things like photos, scroll box, etc, to adjust the width to accommodate the 800x600 screen resolution users.

Note the difference in the Google sitesearch box in the two blogs. In Weight Control Tips, I have to make the search box narrower as it uses the main column is fluid width, and wider search box will cause problems when viewed with a small screen (800 x 600) if I make it wider.

If you want to use Thur's DownRight v1.4 template, you can download it here.

The proceedure to change the template will be the same as described above.

Note: The blog using the above template will appear OK in Internet Explorer and Opera, but in Flock, the left sidebar is shifted to the left so that it overlaps the main column. However, this should not be too much of a problem as very few surfers use Flock. Anyway, I put below a screenshot of the blog as it is displayed in Flock:

Articles on Fitness blog as displayed in Flock browser

Hackosphere 3 column Minima New Blogger template

This blog uses Hackosphere 3 column Minima New Blogger template. If you want to know the reasons why, refer to What is the best template for my blog.

More New Blogger templated


New Blogger template modified by Stavanger
Dots New Blogger template with Header
New Blogger templates modified by Ramani
New Blogger templates by Isnaini
Ramani's New Blogger Neo template
New Blogger template by Final Sense
New Blogger templates by BloggerBuster
Continue reading →
Sunday, April 15, 2007

New Blogger 3 column templates by Isnaini

0 comments
NOTE: Before you edit or change template, make sure you backup your curremt template PLUS Page Elements. Refer to Backing up current template PLUS Page Elements before changing new template. All templates here will give blogs without the navbar

Here are some 3 column templates for New Blogger by Isnaini, examples of which can be seen at Wedding Tips (using the Nyoba 780 template) and Money and Finance (Using the Nyoba template). Note that the graphic header didn't come with the template and you will have to make your own graphic header and save it into your computer for later uploading. When you first load the template, your blog Header will just be a blank grey rectangle, waiting for you to add the graphic Header.

The templates can be downloaded from Free Templates. There are other templates available there, but they are old classic Blogger templates. To download the template, right-click on the "download" link and select "Save target as.." (wordings will be slightly different for different browsers), and then save it to a suitable folder in your computer.

Computers, Add-ons, handhelds and PDAs, software

To change your template to the newly downloaded template, in the Dashboard, click LAYOUT. You will see a Layout like the screenshot below (click to enlarge). Yours will be slightly because I have added various Page Elements. What I want you to note is the PICTURE Page Element in the Header. Click Edit, then browse to the graphic header you have saved in your computer, then click "Save Changes".

New Blogger Nyoba template layout

Update April 17 2007: I found the gray space in the header too deep for Wedding Tips. I thus went into the template editor and found this block of codes

#header {
height: 180px;
margin: 0px;
padding: 0px;
background-color: $headerBgColor;

and changed height: 180px; to height: 115px;
The codes thus became

#header {
height: 115px;
margin: 0px;
padding: 0px;
background-color: $headerBgColor;


The Header for that blog is as I want it now. Save valuable above the fold space.

More New Blogger templated


New Blogger template modified by Stavanger
Dots New Blogger template with Header
New Blogger templates modified by Ramani
New Blogger templates by Thur
Ramani's New Blogger Neo template
New Blogger template by Final Sense
New Blogger templates by BloggerBuster
Continue reading →
Monday, March 12, 2007

Easy Social Bookmarking for your Blog

0 comments

Social Bookmarking Icons

Found this site that offer an easy way for you to add those social bookmarking icons for a blog or a website. There are now so many social bookmarking sites, and adding as many icons as possible can make your blog or website look cluttered. For example, I found this in the sidebar of a blog:

Social bookmarking icon clutter

Now with AddThis, you can get just a single icon to put on your blog or website, and a visitor clicking on the single icon will get to a page where he can choose whatever social bookmarking service or services he is subscribing to.

I have added AddThis icon for both the blog as well as the individual posts of this blog: Dummies Guide to Google Blogger. You can pop over to that site and test them out.

I will just paste the note that I added as I tried to add those icon to the above blog (note: you can do it without having to register for an account, but I think registering for an account is useful because then you have access to statistics like how many people have bookmarked the blog, etc.)

http://www.addthis.com/
Choose Bookmark or RSS Feed
http://www.addthis.com/account.php
email: xxxx@gmail.com
username: manature
password: yyyy
Message: An account with this username already exist
ignore
signin
Click "Get the code for your button
Which kind of button? Bookmark button/feed button
Chosed Bookmark button
Click radio button to choose the button (chosed the largest one, more visible)
Where? Drop-down menu: "on a Blog"
Blogging Platform: Drop-down menu: chose "Blogger"
Want stats with that? tick "Yes"
Click "Get Your Free Button"
Code for Blog Button:

Note: The codes here are for illustration purposes only. You should get the codes direct from your own account in AddThis as otherwise, you will not be able to see the statistics as it will enter my account instead.

<!-- AddThis Bookmark Button BEGIN -->
<a href="http://www.addthis.com/bookmark.php" onclick="window.open('http://www.addthis.com/bookmark.php?pub=manature&url='+encodeURIComponent(location.href)+'&title='+encodeURIComponent(document.title), 'addthis', 'scrollbars=yes,menubar=no,width=620,height=520,resizable=yes,toolbar=no,location=no,status=no,screenX=200,screenY=100,left=200,top=100'); return false;" title="Bookmark using any bookmark manager!" target="_blank"><img src="http://s3.addthis.com/button2-bm.png" width="160" height="24" border="0" alt="AddThis Social Bookmark Button" /></a>
<!-- AddThis Bookmark Button END -->


To add to top of left sidebar of Dummies Guide to Google Blogger
Click "Add a Page Element" for the left sidebar in the Layout
Selected HTML/Javascript
Pasted in the script
Save
Done

Social Booking icon for the posts

This will involve tampering to your template, so a good thing to do is to backup your template first. If you are new to editing and backing up templates, refer to this post How to backup and edit your New Blogger template. To add the AddThis icon to the bottom of every posts, get into your template editor, tick the "Expand widget template", then look for this line of code:

<div class='post-footer'>

paste directly below the above line of cod this block of codes

<!-- AddThis Bookmark Post Button BEGIN -->
<div><a expr:href='"http://www.addthis.com/bookmark.php?pub=enviroman&url=" + data:post.url + "&title=" + data:post.title' target='_blank' title='Bookmark using any bookmark manager!'><img src='http://s3.addthis.com/button1-bm.gif' width='125' height='16' style='border: 0px; padding: 0px' alt='AddThis Social Bookmark Button' /></a></div>
<!-- AddThis Bookmark Post Button END -->


Preview, and if satisfied, save the template.

Update 14 March 2007: I find it so useful, I think I will add them to this blog as well.

Update 21 March 2007: I got a comment which seem to indicate that the blogger didn't understand how AddThis easy social bookmarking works, so I thought I will do an update to explain further. When you install the AddThis easy social bookmark icon AddThis easy social bookmark icon, the icon include many social bookmarking services. When clicked on, it will open up a pop-up (see screenshot below, click to enlarge):

AddThis easy social bookmarking expanded pop-up

from which you can select a whole range of social bookmarking services. Try clicking on the icon just below this post or the icon at the top or the left sidebar and see what happen.
Continue reading →
Sunday, February 25, 2007

Adding graphic background to blog Header

0 comments
I have previously published a post on how to add a graphic to the New Blogger blog header in this post: Adding a graphic to your blog Header. With this method, other than pictures, you can add other stuff like Google AdSense ads, search box, etc. You also have the choice of leaving the Title alone (for search engine purpose this is good). Or like what a lot of people do, incorporate the title into the graphic and delete the text title which I think is a bad move as text title figure prominently in search engine for figuring out what a blog is all about.

Another way is to leave the Header and the Title as it is and add a background picture, as is done in this blog Business, Travel and Leisure and change color of the text Title to contrast with the background image (for example, for a dark image, make the text Title white). The way to do it is as follows:

First, backup your template (see post Backing up and changing your New Blogger (formerly Blogger Beta) template.

You will need a suitable picture already hosted on the web and have the URL ready. You can either use Blogger to host the graphic. See post Getting the New Blogger (formerly Blogger Beta) to host the photo for your profile, sidebar, Header, etc. (click "BACK" button to get back to this page) or use Photobucket.

Amazon products for graphics

Then in the template editor window, look for this block of codes

#header {
margin: 5px;
border: 1px solid $bordercolor;
text-align: center;
color:$pagetitlecolor;
}

Add the following line to the CSS:

background-image: url(URL of photo);

where URL of photo is the actual URL of the photo already hosted on the web. (Note: you will see some advocating using
background: url(URL of photo);
but background has been deprecated and you should be using background-image instead)

The block of codes then become

#header {
margin: 5px;
background-image: url(url of photo);
border: 1px solid $bordercolor;
text-align: center;
color:$pagetitlecolor;
}

You will have to ensure that the color of the title contrast with the color of the background picture. In the case of the blog Business, Travel and Leisure, the picture is dark, and the original color of the blog title will not contrast well with the background picture, making it almost invisible. I changed the color to white. The block of text was then changed to

#header {
margin: 5px;
background-image: url(url of photo);
border: 1px solid $bordercolor;
text-align: center;
color:#FFFFFF;
}

where #FFFFFF is the HTML code for white.

To make things clearer, I paste below the actual codes to produce the background picture and to change the color of the Business, Travel and Leisure blog:

#header {
margin: 5px;
background-image: url(https://blogger.googleusercontent.com/img/b/R29vZ2xl/AVvXsEj-10tiJZ27oMTBjiLViLqBhyphenhyphenrQw-wbVmBYmDcMMWpK5Cvo41LzWY_JsZwmd_mq3gd29ozZJuIDqqlkCcnGKtCIPn_YG0fY3JAcVm0IMgDQhc-WpRWq6AFk2wauBwyKCMEoqv4y3MCz813c/s1600/Bukit+Tinggi,%2BPahang%2BHEADER%2BGRAOHIC.jpg);
border: 1px solid $bordercolor;
text-align: center;
color:#FFFFFF;


Update 15 July 2007: Regarding whether there is a need to resize the picture to fit the Header, please refer to my response to Eternalsoul in the comments

Related posts


Special fonts for your blog clickable graphic header

How to put image or logo no the side of the header
Continue reading →
Friday, December 8, 2006

New Blogger template or old classic template?

0 comments
When bloggers upgrade their Blogger classic account to the new Blogger beta account, there is often confusion, with bloggers pleading such things like "I don't get Layout" etc. This post is to try to pinpoint the problem, which is, whether the blogger has upgraded his classic template to a beta template or not. Look at the screenshot below (click to enlarge):
Blogger Beta: using a classic template or a beta template
In the screenshot, you will see 2 blogs, one with the classic template and one with the beta template. In the first case, on the extreme right, you will see "Layout" (circled in red) and in the second case, you will see "Template" (also circled in red). The first case is a beta blog while the second is still using a classic template. In order to upgrade to a beta template, click on "Template" then click on the "Customize design" subtab, then chose a new beta template.

Amazon products on Blogger templates

  NEWER POST    HOME  OLDER POST
Continue reading →
Saturday, August 19, 2006

Blogger Beta: Adding advertisement (and hit counter)

0 comments
NOTE: This post was published when AdSense ads could not be displayed on a Blogger blog, but that had been fixed. There were a few updates which some readers seem to miss as one comment showed, so I hope you will read through the whole post. Maybe if I have the time, I should rewrite the post
--------------------------------------------------
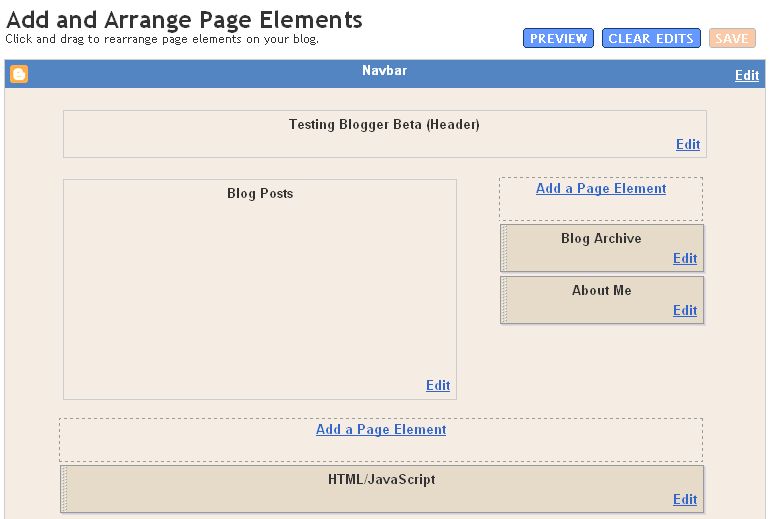
It is now easier to add things like advertisements and hit counter, etc. to a Blogger Beta blog. For example, you want to add an Amazon advertisement to your blog. All you have to do is to go to layout (see screenshot below) You will see a section at the top where you can edit the header, a section in the middle where you can edit the appearance of your post, sections on the right where you see a section "Add a Page Element". This will be the section that we will be using to add an Amazon ad to the right sidebar. Below that section are two sections where you can edit the Archives and the About Me section. Below the post and the sidebar sections will be the footer sections where you see another "Add a Page Element" where you can add things like a copyright notice, hit counter, etc. In this case, a hit counter has been added, and you see that just below the "Add a Page Element" section (where you see HTML/JavaScript).

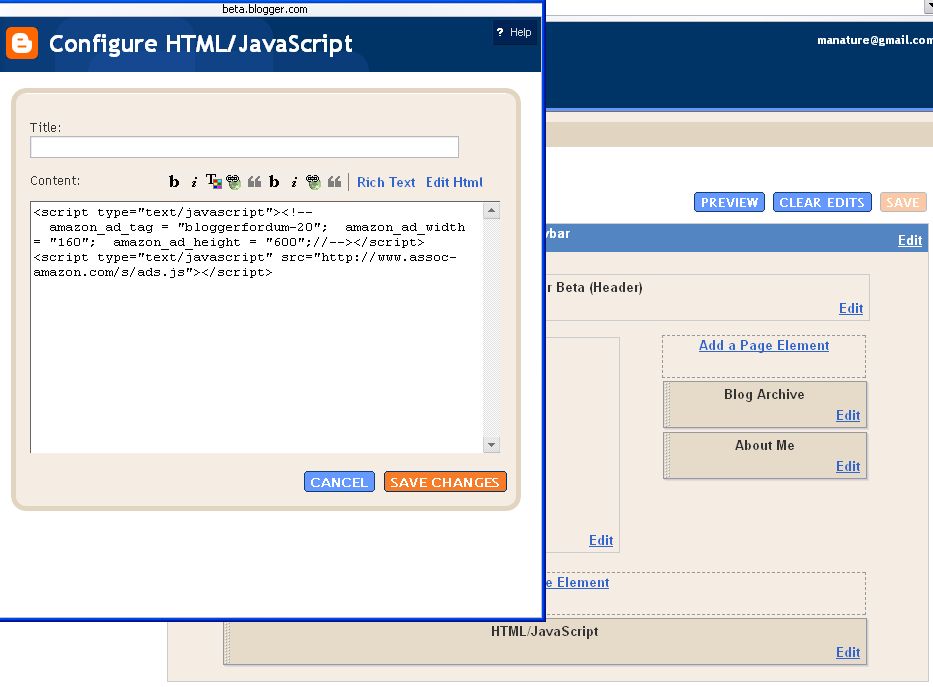
We will now describe how to add the Amazon ad. First, you sign into the Amazon Associate site and generate the script. Copy the script, then go to the Blogger Beta layout page, and click on the "Add a Page Element". A pop-up will appear (see screenshot below)
All you have to do now is to paste the script into the box and click "Save Changes" and once it is done, it will appear below the "Add a Page Element" section. Now that it has been added, you can preview the result, and if you do not like the position, you can drag it to the position you want. All you need to do is to hover your mouse over the Page element. The cursor will change into a cross (see screenshot below. Highlighted with a red circle and an arrow pointing to it):

Cursor change to cross to enable dragging Page Element

You can, for example, below the "About Me" section. No more having to squint through long list of HTML to figure out where to paste the script. Isn't this easier than the old method?

Latest Update: Got a response from AdSense Help. They said they have resolved the problem that was preventing Google ads from appearing on Blogger beta pages. You no longer need to modify the code. I have tested that by adding a Wide Skyscraper Ad unit to the sidebar using the method detailed above without any modification to the code, and it displayed without problem. You can see it at Testing Blogger Beta. (close new window to get back to this page)

Adding a hit counter like statcounter

You can read about how to generate the script for a hit counter by surfing over to (WILL CONTINUE EDITING LATER)

Update on statcounter: Someone commented that statcounter in Blogger Beta doesn't work for individual post page. I decided to check that out by checking my statcounter statistics. I viewed the "Popular Pages" and found that there were hits counted for individual post pages, so it proves that statcounter added in the way described in the link does work. If you want to see a screenshot of that statistic, surf over to Problem with statcounter in Blogger Beta? (close new window to get back to this page). The screenshot is at the bottom of the page.

Update 23 February 2007: A reader complained of not being able to add statcounter in New Blogger. I have added statcounter into many blogs in the manner described above, some of them without ticking "XHTML Comppliant" and they worked, as I have explained in the update above. However, if you want to be sure, tick "XHTML Compliant" to generate the script for the statcounter (see screenshot below). For me, I have found that there is no difference, but if you are having problem, try that and see. Note that if you are reinstalling statcounter, you don't have to start from scratch. When reinstalling, click the spanner icon to start off from where you left off.

Installing Statcounter, selecting XHTML Compliant


Books from Amazon

The Rational Guide to Google Blogger (Technical accuracy is assured by Biz Stone, Former Senior Specialist on the Google Blogger Team)

101 ways to Boost Your Web Traffic: Internet Marketing Made Easier

NEWER POST OLDER POST
Continue reading →
Wednesday, May 24, 2006

Creating categories step-by-step

0 comments
Update: This post was written before Blogger upgraded from the old classic Blogger template to the New Blogger xml template (see old Blogger classic template or New Blogger xml template?, and we had to depend on work-arounds to implement categories, and this method involves manual work each time a new post is published. New Blogger introduced Labels (same as categories) which is automatic, and with New Blogger xml template, it is better to use Label list to add a list of Labels (categories) in the sidebar.


In earlier posts:
Blogger categories: A simple method
Blogger categories: Simple method
methods to create categories was described. However, a reader has indicated a step-by-step description is needed, so here it is:

1. Create a del.icio.us account (see Introduction to del.icio.us). Even if you already have an existing del.icio.us account, creat another one specially for setting up the categories. For the user name, I would suggest using part of the blog's url or title. For example, the user name I selected for doing the categories for this blog is bloggertricks.

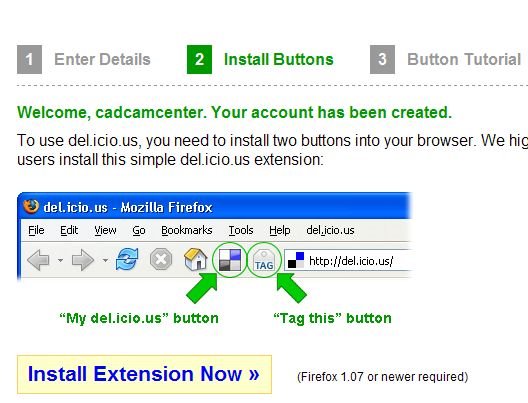
2. If you are using FireFox (highly recommended), install the del.icio.us extension with the "My del.icio.us" and "Tag this" buttons (see screen shot below:

Click the "Install extension now" button and follow the instruction. This will install 2 buttons into the toolbar.

3. Click the "My del.icious" button. Confirm that you are logged in. If not, then log in.

4. Surf to the main page (index page) of your blog. At the PREVIOUS POSTS section of the sidebar, click on the very first post. This will take you to the individual post page (permalink) of that post, and the PREVIOUS POSTS will then display the next 10 previous posts. Click the "Tag this" button. A pop-up will open with the url, a description, and boxes for you to enter notes and tags. Enter one-word tags for the category you want that post to be in. If the category is more than 1 word, join them with a hyphen or underscore. For example, for my post entitled "Hiding the navbar", since the post is specific to Blogger, I will tag it with "Blogger-specific" (minus the quotes). You can enter more than 1 tag for each post, the tags just have to be separated by a space. Click [save] when you are done.

5. At the PREVIOUS POSTS section in the sidebar, click the next post, which will take you to the individual post page of that post. Click the "Tag this" button again, and tag that post

6. Repeat for the subsequent post until you have tagged all the posts.

Now, you will have to decide which of the methods you want to use - the Easy Method, or the Simple Method. For an example of the Easy Method, surf over to Natural Remedies to see what it is like. The categories created for this blog Blogger Tips and Tricks is an example of the Simple Method. For the Easy Method, go to step 7. If you want the Simple Method, go to step 9.

Easy Method

7. Click the "My del.icio.us" button. At the top right-hand corner of the My del.icio.us homepage, click HELP, then under BLOG INTEGRATION, click TAG ROLLS. Adjust the settings until the appearance of the tag roll you see in the PREVIEW on the right is what you want. I suggest you change the TITLE to Categories or something suitable. For a fuller description of the settings adjustment, refer to the post Blogger categories: Easy method.

8. If the appearance of the categories (tag roll) in the preview window on the right is what is desired, click on the code box at the bottom of the page to highlight it, right-click and copy (or ctrl+C). Preferably in another tab or window, sign into Dashboard, select the blog, click the TEMPLATE tab to open the template editor and paste the codes into your template in a suitable place. If you don't know where to paste it, refer to Blogger template tutorial: Adding content via the template. Preview, and if satisfied, save and republish. Done.

Simple Method

9. Click the "My del.icio.us" button. This will take you to the "homepage" of your del.icio.us account. On the top right corner, you will see the tags you have created.10. Click on one of the tag (for example, BASIC). This will take you the the del.icio.us page that contains all the links to the posts that was tagged with the category BASIC. Highlight the url in the address bar of that page, right-click and copy. In this example, the url will be http://del.icio.us/bloggertricks/basic.

11. Decide on a suitable place where you want the categories displayed (refer to Blogger template tutorial: Adding content via the template). This will normally be in the sidebar. Open a new window (or tab) and sign into Dashboard, select the blog, click the TEMPLATE tab, and in a suitable place in the template, enter the following code:

<h4>CATEGORIES</h4>
<a href="X">A</a><br />
<a href="Y">B</a><br />
<a href="Z">C</a><br />

where X is the url you copied from step 10, and A is the text of the tag, in this example, BASIC.

12. In the previous window, go back to the My del.icio.us homepage, click on the next tag. In the above example, it will be BLOGGER-SPECIFIC. At that page containing all the links to the posts that are tagged with that category, again copy the url, replace Y with the url, and B with the second category. In the above example, the codes will become

<h2>CATEGORIES</h2>
<a href="http://del.icio.us/bloggertricks/basic">basic</a>
<a href="Y">B</a>
<a href="Z">C</a>

(Y and B have been left as it is in the above example as putting in the real url will make the code extend beyond the gray box, but I hope you get the idea)

13. Repeat step 12 for the third category

14. If there are more categories, just add more hyperlinks and repeat the steps.

15. When all the categories hyperlinks are done, preview, and if satisfied, save and republish. Done.

Books from Amazon

Publishing a Blog with Blogger: Visual QuickProject Guide

Book: Blogging for Dummies

NEWER POST    OLDER POST
Continue reading →
Related Posts Plugin for WordPress, Blogger...