Showing posts with label links. Show all posts
Wednesday, August 12, 2009

Hyperlink: Difference between target="new" and target="_blank"

0 comments
If you are not familiar with the HTML hyperlink tab <a>, go first read anchor text and how to make hyperlink open in new window or tab and/or making active (clickable) hyperlink in posts and comments. Please take note that the target attribute has been deprecated and will not pass W3C XHTML 1.0 Strict validation. So if W3C validation is important to you, you should not use the target attribute.

To make hyperlink open in new tab or window, one uses either the target="_blank" or target="new" or target="anything" where anything is exactly that, any word, even meaningless one like "abtjsgj". Now I have received query what is the difference between them. Before publishing this post, I have tested the hyperlinks with different attribute at testing target attributes for hyperlinks where you can try out the links yourself.

When you use the target="_blank" attribute for the hyperlink <a> tag, all links with that attribute will open in new windows or tabs. When you use the target="new" or target="anything" attribute, the first click on any link with that attribute will open in a new window called new or anything. Any subsequent click on any link with that attribute will open in the same window called new or anything.
Continue reading →
Monday, July 30, 2007

Make a clickable picture (image, photo or screenshot, banner)

0 comments
In response to a reader's request, I am showing in this post how to make a picture (an image, photo or screenshot) clickable, that is, become a hyperlink.

The first thing is you must get the picture up on the web. This you can do by uploading to Photobucket, Get Blogger to host your picture or start a PUBLIC Google group to upload your photo. Get the URL of the photo on the web.

The basic HTML for the clickable picture (picture hyperlink) is:

<a href="URL of target site"><img src="photo URL"></a>

To the ><img> tag, you can add more attributes separated by space, especially the alt="description" tag which will give some information of the picture and will server 2 purposes. Search engines cannot read images, but they can read what is written what is typed between the "" marks in the alt="" tag. This will help the search engines knows more about your post and helps in SEO (Search Engine Optimization). When for whatever reasons the picture cannot be displayed, instead of an empty box, the visitor will see what it typed between the "" marks in the alt="" tag.

Another attribute is the width="W" where W is the width of the image in pixel you want it to display. This is especially important when the image you uploaded is a wide picture which may exceed the width of the main column (if you include it in a post) or the width of the sidebar (if you put the image in the sidebar). You will then have to know what it the width of the main column or siderbar. Refer to How to find the width of the blog Header, main column and sidebar (click BACK button to get back to this page).

A less important attribute is the title="" attribute. If you add this attribute, when a visitor hovers the mouse over the picture, a tool tip will appear displaying what you typed between the "" marks. This may give more information to the visitor on what to expect if he clicks on the hyperlink picture.

As an example, I will put a clickable button (made by a grateful reader without me asking) below:

blogger resources, help for bloggers using Google Blogger platform. It is supposed to link to this blog, but since your are already in this blog, I have linked it to a site made for complete Blogger beginners. Hover the mouse and observe what happen and click on the banner to see where it takes you. For clarity, I will put the HTML used to display the clickable banner in the scroll box below:

<a href="http://dummies-guide-to-google-blogger.blogspot.com/" target="new"><img src="https://blogger.googleusercontent.com/img/b/R29vZ2xl/AVvXsEhWmooOdIgpPdy7uRF9OGXrZMbMhVxVnOF8iYJNZ4334m8-F5DG3VHX44hBDH_zy4PkvfNp822HF-g5SbcHWUfg7yfcFnT52Zn_Fr9XGpGgcGyyWbYYEu8q8BbKtmpPeOI0wisRR-qi6bnP/s1600/Peter+Chen's+Blogger+Tips+&+Tricks.jpg" alt="blogger resources, help for bloggers using Google Blogger platform" title="Get great information and help here by clicking on banner"></a>


For more information, refer to How you can help Blogger Tricks and Tips (on a completely voluntary basis, no one should feel obligated)
Continue reading →
Tuesday, July 17, 2007

Importance of anchor text in links (hyperlinks)

0 comments
The HTML for a clikable link (hyperlink) is

<a href="target site URL">anchor text</a>:

where anchor text is whatever what you should type in which you want displayed (seen) on the web (if unfamiliar with URL, see What is URL and how to get it). For example, this HTML

<a href="http://foodasmedicine.blogspot.com" target="new">Natural Remedies</a>

will result in the following clickable link as seen below which when clicked open the target site in a new window:

Natural Remedies

I have added the attribute target="new". Some also use target="_blank" but the first one you don't need to press the shift key and is shorter. Please note that both has been deprecated and is on the way out with the XHTML (strict) coming into force. However, both will still been supported by XHTML (transitional) for a long while more.

The anchor text is important to search engines because it tells what the target site is all about and you should use something relevant/descriptive of the site for the target site. Don't ever use

<a href="target site URL">herelt;/a>:

as it tells nothing about the target site, and is useless for telling search engines what that target site is all about.
Continue reading →
Saturday, January 27, 2007

How to link a spot on a page to another spot in a DIFFERENT page

0 comments
Below are the instructions on how to hyperlink from a particular spot in a post of webpage to another particular spot in a
DIFFERENT post or webpage
. If you are looking to linking from one part of a page to another part in the SAME page, then refer to How to enable visitor to jump from one part of a page to another part in the SAME Page.

This is how you can link a particular spot in a page/post to a particular spot on a DIFFERENT page. Let's say you want this link Vitamin D to a particular spot on another post of another blog: Get a dose of sunshine. It is good for you, in particular to a particular word "Vitamin D" in that post, which can be the same or different blog.

What you have to do is to first get the URL of the target page, which in this case is:
http://foodasmedicine.blogspot.com/2007/01/get-dose-of-sunshine-it-is-good-for-you.html
.

The visible word "Vitamin D" (link) that you see above is surrounded by a pair of HTML hyperlink tag as shown below (it is the actual HTML to display the link "Vitamin D" above):
<a href="http://foodasmedicine.blogspot.com/2007/01/get-dose-of-sunshine-it-is-good-for-you.html#XYZ" target="_blank">Vitamin D</a>


Note that the link is followed by a name attribute #XYZ where the name attribute XYZ can be anything you want. Then in the post editor of that other blog, you surround the word "Vitamin D" by a title, paragraph or division tags, for example, <h2 id="XYZ">Vitamin D</h2>

This had been done. You can click on the link "Vitamin D" above and see where it takes you. Note that clicking on the link "Vitamin D" at the top of this page opens up a new window to a spot in the middle of a page with the word "Vitamin D". If you don't need the link to open in a new window, just leave out target="_blank" in the HTML.

Acknowledge: This post is a result of a tip from ces1977 of Thirty Is the New Twenty
Continue reading →
Wednesday, January 10, 2007

Recent posts widget using feed and script generator

0 comments
Note: A number of inconsitencies have been found as I am editing this post. I will have to do many tests later and reedit this post. Please be patient.

A reader asked for a hack for RECENT POSTS for the New Blogger (formerly beta). Have a look at this list of posts in this blog Natural Remedies. The RECENT POSTS is at the second from the bottom of the right sidebar, just above the "Contact Me" link.

You can generate a Javascript to put into your Page Element to display any number of posts you want, including all. The script generator is at http://itde.vccs.edu/rss2js/build.php.

You will have to enter the feed URL for your blog which will take the form of
http://yourblog.blogspot.com/rss.xml or
http://yourblog.blogspot.com/feeds/posts/default?alt=rss or

(substituting "yourblog" with the actual URL of your blog and respond to a number of choices as shown in the screenshot below (click to enlarge):

Feed2js Recent Posts widget generator

If you select the number of items to display to zero, then all the posts will be listed. I have limited it to 8 as showing all posts will give a very long list. Putting "Show item descriptions?" as 0 will give no description, 1 will give full description, and n>1 will display the first n characters of the description. The rest are self-explanatory.

I chosed "1=show full description text". When you are finished, click "Generate Javascript", highlight all the script by clicking inside the script box and press ctrl+A keys (or right-click and select "copy") to copy the script into the clipboard.

It will be good if you are using a browser like FireFox which has tabbed browsing (FireFox is also recommended by Blogger). Then you can open a new tab and log into your Blogger account to get to the Dashboard which will show a list of all your blogs. Click LAYOUT for the relevant blog and click ADD A PAGE ELEMENT in the section you want the "Recent Posts" to be (most likely in the sidebar). Select HTML/Javascript and paste the script from the clipboard into the box. Preferably type in something like "Recent Posts" or something like that in the title, then click "Save Changes". This new Page Element will appear at the top of the section. If you want it elsewhere, hover your mouse cursor over the new Page Element. The cursor will change to a cross. Drag it to wherever you want. In the above case, I dragged it to the second last in the right sidebar section,. Click "Save" at the top of the LAYOUT and if you want to see the result, click VIEW BLOG.

I used
http://foodasmedicine.blogspot.com/feeds/posts/default?alt=rss
for Natural Remedies and tested adding a new post. When I view the blog after publishing the new post, I could not see the latest post in the list of "Recent Posts", so I tried again with another blog Medical Matters using

http://medical-products.blogspot.com/rss.xml

and also this time chose "Show title and description"

(the "Recent Posts" is at the second from the bottom of the right sidebar, just above the Profile. I published a new


http://foodasmedicine.blogspot.com/?


copy the generated script, go to the Layout of your blog, click "Add a Page Element", then select HTML/Javascript, and paste the script into the pop-up window. In the pop-up for the "Add a Page Element" widget, put in the TITLE "List of Post" so that your list of post will have a visible heading.

Just a little note. Whenever you add a script into a Page Element, it is good to add a comment (not seen on the web) which tells what the script is for. This is so that when you know what the script is for. In my case, I have added the comment
<!-- list of posts hack --> at the top of the script so that I will know what the script is for. Comments are not displayed on the Webs, and are good to document codes so that one will not forget what it is for.

<!-- list of posts hack -->
<script language="JavaScript" src="http://itde.vccs.edu/rss2js/feed2js.php?src=http%3A%2F%2Ffood-drinks-and-recipe.blogspot.com%2Frss.xml&chan=n&num=0&desc=0&date=n&targ=n" type="text/javascript"></script>

<noscript>
<a href="http://itde.vccs.edu/rss2js/feed2js.php?src=http%3A%2F%2Ffood-drinks-and-recipe.blogspot.com%2Frss.xml&chan=n&num=0&desc=0&date=n&targ=n&html=y">View RSS feed</a>
</noscript>


UPDATE: This hack does not seem to be working. Using the above feed URL, a List of Post is produced which does not show new posts added. I tried another URL, in this case, http://food-drinks-and-recipe.blogspot.com/feeds/posts/full. The first time, it was added, it showed a list of post. The moment a new post is added, all the post titles disappeared.

UPDATE 23 January 2007: Someone commented in this post about using JSON. Did a Google search for "JSON blogger beta" and found this: JSON on New Blogger and a backlink to Blogger Hack for recent comments and posts. Added what I found in that blog, changed "comment" to "post" and got a list of post but with the title RECENT COMMENTS". Anyone knows how to change that to RECENT POSTS?

UPDATE 23 January 2007: Found another hack at Beautiful Beta: Widget Installation and download page. The result of the hack is at the bottom of the left sidebar at Food, Drinks and Recipe. So now, you have 3 methods of adding List of Recent Posts.

  NEWER POST    HOME  OLDER POST
Continue reading →
Wednesday, January 3, 2007

How to change the color of your hyperlink

0 comments
Someone commented in blog Blogger for Dummies and I went to his site Dogs Puppies Training and Care by Kevin the Collie. I noticed in his header a link which was in dark blue which merged into the dark green background and thus became almost invisible. I don't know if the color was controlled by the CSS (Cascading Style Sheet) or not, but in any case, if you want a link to be of a certain color, you should write the link in the following way (assuming you want it to be in red): <a href="URL><span style="color:red;">description</span></a>.

Update: Someone asked whether it is possible to post things other than hyperlinks in color. Sure. Just enclose the text with the <span style="color:red;"> and </span> tags. For example you want these text to be in green, just put <span style="color:red;"> in front of "these" and </span> after "green"

  NEWER POST    HOME  OLDER POST
Continue reading →
Tuesday, January 2, 2007

How to check the links in your blog

0 comments
To check the links, go to W3C Link Checker and type or paste the URL of your blog into the box.

  NEWER POST    HOME  OLDER POST
Continue reading →
Monday, December 4, 2006

How to put a active (clickable) picture in the sidebar

0 comments
The way to put pictures in the sidebar of a Blogger blog will depend on whether you are using a Blogger classic template or a Blogger beta template.

Blogger Classic

You will first have to upload the picture to the web, either via Blogger (see How to get Blogger to host your picture for the profile, etc. (close new window to get back to this page)) or host it with Photobucket. For a comparison between the two methods, see post Comparison between hosting images with Blogger and Photobucket (click "BACK" button to get back to this page) Update 22 May 2007: Photobucket has been acquired by MySpace which is part of Fox Interactive Media (FIM) for $300 million!!! That means that Photobucket is now backed by another giant. That changed the situations and what has been said above may no longer apply.. Once you have the URL of the picture, you just insert this HTML code into the sidebar:
<a href="URL of target site"><img src="URL of picture" alt="" width="" height=""></a>
, making sure that the figure in between quotation marks (width="") of the picture does not exceed the sidebar width (you can leave out the height="" if you want and the image will automatically be rescaled to keep the aspect ratio constant and the image undistorted).

Update: You can also upload your photos at Google Page Creator

You may also just resize the picture to fit the sidebar before you upload it, and leave out width="" and height="", and the picture will then display in the actual size. The attribute alt="" is optional, but it is good to include in and type the description of the picture in between the quotation marks. This is because search engines cannot read images, but can read the alt text. For either way, the free Irfanview photo editor will be of great help. See post Using Irfanview photo editor for your blog (click "BACK" button to get back to this page).

Regarding which part of the old classic template to paste it in, this post will be a good guide: Blogger template tutorial: adding content via the template (click "BACK" button ot get back to this page).

Once done, just click SAVE TEMPLATE, then REPUBLISH.

Blogger beta

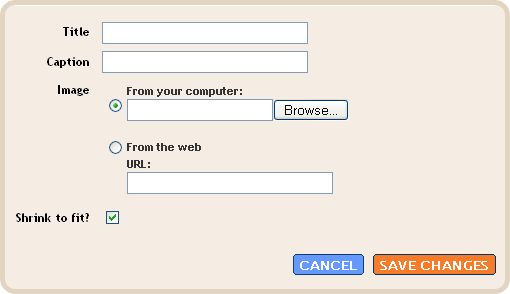
If you just want a (non-clickable) picture in the sidebar of a Blogger beta template, it is very easy. You just sign into the Dashboard, and in the relevant blog, click LAYOUT, then click "Add a Page Element" in the sidebar. In the pop-up, you then select "Picture" and click "Add to Blog". You can either select the picture from your computer (Browse), or if have the picture already hosted on the Web, type in the URL. You have 2 choices - add the picture in the actual size or resize to fit. If you use the actual size, you will have to ensure the width of picture does not exceed the sidebar. You also have the option of adding a title and a caption. When done, just click "Save changes", and you will see a new page element (widget) titled Picture at the top of the sidebar of the LAYOUT. You can drag it into whatever position you like. However, this method will give you a non-clickable picture.
Blogger beta: adding a picture in the sidebar

To make a clickable link, I will describe the method by describing how I added a clickble picture in the sidebar of this blog: Star Home Improvements (close new window/tab to return to this page).

I first need to know the width of the sidebar. I am using Ramani's Blogger Beta 3 column template. To get the width, I first get into the template editor (click TEMPLATE > EDIT HTML) and found this block of CSS code:

#sidebar-wrapper {
width: 150px;
float: right;
word-wrap: break-word; /* fix for long text breaking sidebar float in IE */
}

This means that the width of sidebar is 150px, and that is the maximum width (pixels) of the photo I can put in the sidebar without causing the sidebar to slide to the bottom of the page. I first uploaded the picture via a post in Blogger: Malaysia Cameron Highlands Smokehouse (close new window/tab to get back to this page). I click on the picture which will take me to the page on the Web containing the full size of the picture. I copied the URL from the address bar (you can also right-click on the picture and select "copy shortcut" to save the URL to clipboard) and paste it into Notepad for later use. (Update: it has been found that this method doesn't work with the New Blogger anymore. You will have to click on the image to be taken to the page containing just the image, click EDIT > VIEW SOURCE in the menu bar at the top of the page, then get the actual URL of the hosted image from the source code).

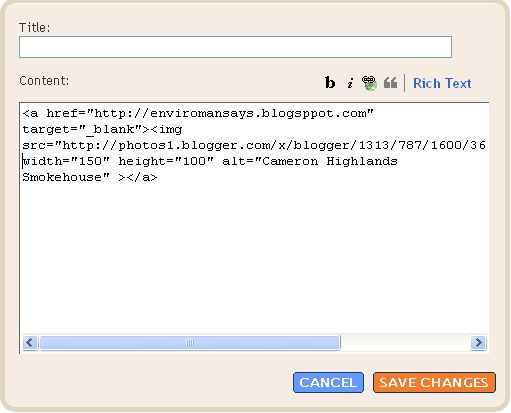
I then go to the Dashboard of Star Home Improvements and click on LAYOUT, followed by clicking on "Add a Page Element" on the sidebar. But this time, instead of selecting "Picture", I selected "HTML/Javascript" and click "Add to blog". I then typed the hyperlink tag into the window:
<a href="URL of target site"><img src="URL of picture" alt="" width="150" height="100"></a>

Blogger Beta: Configure HTML/Javascript
I then click "Save changes" and the clickable image will then be added to the top of the sidebar of the blog Star Home Improvements (close new window/tab to get back to this page). Try clicking on the image and see where it takes you. I hope you do that because our Spaceship Earth needs help.

  NEWER POST    HOME  OLDER POST
Continue reading →
Saturday, November 11, 2006

Precaution to take before linking to a Website

0 comments
Occasionally, you may get a request for a link exchange, or you may just want to link to a site as part of your post, or you just like the site. Before you link to any site, it is good to check the PageRank of the site. In the first place, it will be advantageous to you if you exchange with a site that has a higher PageRank than yours. However, any link relevant to your site content, whatever the PageRank (as long as that site is not blacklisted) helps in the ranking. More important is to find out if the site has been blacklisted by Google. A site may be blacklisted for doing black-hat SEO (Search Engine Optimization) such as making certain keywords invisible by making the color of the font the same as the background, etc. It does not matter if a blacklisted site link to yours as Google knows you have no control over who link to you. However, you do have control over who you link to, and if you are unfortunate enough to link to a blacklisted site, your site will also be blacklisted.

The question now is, how can you find the PageRank of a site, or more important, how would you determine if a site have been blacklisted. You can do this easily by installing FireFox with Google toolbar (close new window to get back to this page). After installing FireFox with Google toolbar, you should surf over to the site using that browser and look for the the PageRank icon, FireFox with Google toolbar PageRank icon let your mouse hover over the box in the icon and the PageRank of that site will be displayed with value from 0 to 10. If the box is grayed out, and no value (not even zero) is shown, that means that site had been blacklisted by Google and you should not link to that site. Otherwise, your site will be blacklisted as well.

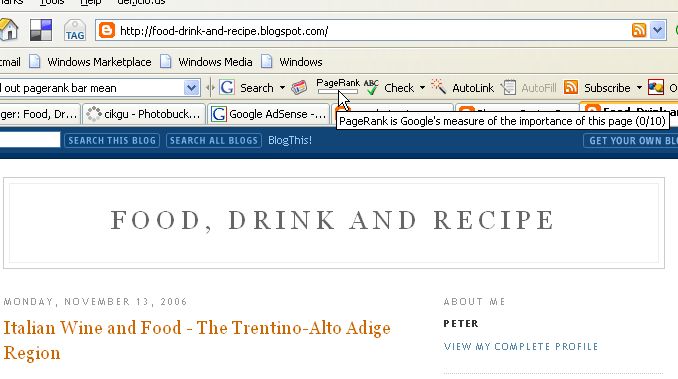
Update 14 November 2006: Someone left a comment which contain a long unbroken and unclickable link which will cause my blog's sidebar to slide to the bottom of the page. This is the third time I may be forced to delete the comment (I have tried viewing this post in IE before deleting it, but suprisingly the sidebar is not affected so I have not deleted the comment yet. Took me some time because I was getting the error 500 message, but now it is viewable. Anyone viewing the post/blog with IE, I hope you will comment and let us know what you see w.r.t the sidebar). However, I reproduce part of the comment here: ""A completely gray PageRank toolbar meant that Google did not have that page listed in their index – either because the page was too new to have been indexed, or the page had been banned by Google.' therefore how can you say a grey out box means the site has been blacklisted." There seem to be some controversy over the interpretation of the Google toolbar PageRank icon, and hoping to clear this matter up, I have contacted Google for an authorative interpretation. I hope I get a response, and if I do, I will post it here. I am a scientist, and scientists like to experiment. So I have created a completely new blog with just one article and which should definately not have been indexed yet, and checked the PageRank with the Google toolbar icon. The PageRank toolbar was not grayed out but white, and the value shows zero. See the screenshot below (click on the screenshot to enlarge):
Google toolbar PageRank icon


  NEWER POST    HOME  OLDER POST
Continue reading →
Tuesday, November 7, 2006

Adding a link list to the sidebar in your blog

0 comments
This post is written to help a new blogger add a link list to the sidebar in his blog. The link list will be sligtly different from the default link list provided by default in most standard Blogger templates. It will not be an unodered list, which will have gaps in between links, and take up valuable real estate. If you prefer to have space between the links, just add an extra <br /> to the end of HTML for the link. The more <br /> you add, the wider will be the space between the links. Also, if you like my blogs and find it helpful, and want to easily come back to this (and other blogs) plus help other Blogger bloggers find useful information, perhaps you can add this to the template of your sidebar:

<h2>Blogger Resources</h2>
<a href="http://blogger-tricks.blogspot.com" target="_blank">Blogger Tips and Tips</a><br />
<a href="http://bloggerfordummies.blogspot.com" target="_blank">Dummies Guide to Google Blogger</a><br />
<a href="http://testing-blogger.blogspot.com" target="_blank">Testing Blogger Beta</a><br />


Highlight the whole code (click on the inside of the box, press CTRL+A, right click and select copy, then click in a suitable position of your template. To find a guide to where to paste it, this post can help you: Adding content via the Blogger template (click "BACK" button to get back to this page). You can add or subtract from the list of links as you wish.

The above is for those using the Blogger classic template. The way to add a link list is different in the Blogger Beta template. For that, you can add a link list by clicking on "Add a Page Element" in the Layout. More about that later.

If you prefer to separate the links more, you can use an unordered list instead. Then the code you should add will be:
<h2>Blogger Resources</h2>
<ul>
<li><a href="http://blogger-tricks.blogspot.com" target="_blank">Blogger Tips and Tips</a></li>
<li><a href="http://bloggerfordummies.blogspot.com" target="_blank">Dummies Guide to Google Blogger</a></li>
<li><a href="http://testing-blogger.blogspot.com" target="_blank">Testing Blogger Beta</a></li>
</ul>


The codes given in the first box will cause this to display in the sidebar in the chosen position:

Blogger Resources


Blogger Tips and Tips
Dummies Guide to Google Blogger
Testing Blogger Beta

and in the second case:

Blogger Resources


You can also use Link List Page Element, but the advantage of using the HTML/Javascript PageElement is that you can backup Link List made using HTML/Javascript Page Element. Link List made using the Link List Page Element cannot be backed up, and if you ever have to change the template, it is highly likely it will be deleted and you will have to start all over again. For fuller details, see Backup template PLUS Page Elements and changing new or backup template


  NEWER POST    HOME  OLDER POST
Continue reading →
Thursday, October 19, 2006

Test post to see if the method described in the previous post apply to sections in new pages

0 comments
Update: The method to link from a particular spot of one page to another particular spot in a DIFFERENT page is given here: How to link from one spot on a page to a particular spot in a different page.

I doubt it will work, but I have to try anyway to make sure the rebuttal I intend to make to someone attacking me on a forum is accurate. (see thread hyperlink to a specific spot in another document (close new window to get back to this page).

I am trying to see if the method How to enable your visitors to jump from one part of your post to another (Click "Back" button to get back to this page) to make a link jump to a specific word in the same page will also work for jumping to word in another page. So I am going to see if a clicking a link on this page can cause the reader to jump to a specific word on another page. The way I am going to test it is to go to the individual page (permalink) of this post, click on the link, and see if it will help me jump to a specific word on that post.

Here is the link: A word in a another post. If it leads you to another post with the word "This is where it should land", then the method described will work for jumping to a specific word in another page, but I really have serious doubts, but I have to try anyway.

Update: Well, I tried. I have made the target in the next post where clicking on the above link should lead to, but nothing happens when I clicked it. This confirmed what I had said in the previos post, that the method wouldn't work for jumping to a specific word in another page.

UPDATE 2:
Trying another method. This link should lead you to a spot in another page (next post) "This is where it should land. I am always in the process of learning and trying things out, so let's hope for my reader's sake, it works. (Note: for some reason or other, the HTML for the link is not accepted because Blogger is giving the error message "Your HTML cannot be accepted: Tag is broken:" even though when I ask those who should know says the HTML is OK. Will try another time when I have the time and the information).


NEWER POST    OLDER POST
Continue reading →
Wednesday, October 18, 2006

How to enable your visitor to jump from one part of your post to another

0 comments
Sometimes bloggers may want to make it easier to navigate to a particular section of their page by clicking on a link rather than scrolling around the page to look for it. For this, you will have to use the target attribute and the name attribute.

For example, you want your visitor when they click the link evolution to be led to a section "Evolution". Then what you should do is to first put a target attribute at the section "Evolution" somewhere on that same page.

Then in the section Evolution, the target attribute you should put there will look like this:

<h2><a name="evolution">Evolution</a></h2>
or you can also write it this way:
<a name="evolution">lt;/a><h2>Evolution</h2>
or even
<a name="evolution">lt;/a>Evolution or any text, it doesn't matter.

Then, in the original spot from where you want your visitor to jump to the "Evolution" section, you put the name attribute which will look like this:

<a href="#C4">See Evolution</a>

Example


Let's say this have a block of information here, and then described something that would help the reader to jump to the section on evolution. (not sure how much text I need to put in to make a good example). So I put a link here See Evolution

The code for the above link is
<a href="#"evolution">See Evolution</a>

Then I may have a block of text here, which I wish is much longer, but for the moment I am just going to do a simple example to try to demonstrate better. OK, this is the part I want the reader to jump to when I click on the link above:

Evolution

Study of Evolution


The code I put in front of "Study of Evolution" is
<h2><a name="evolution">Evolution</a></h2>

I really wish I have more text to demonstrate better, but there are just too many files in my "to do" folder. However, I think what I did above is enough to illustrate and explain further how to do it. If any reader find any difficulties, do comment in the comments section, and if I have the time, I will do something about it.


NEWER POST    OLDER POST
Continue reading →
Thursday, October 12, 2006

How not to put off visitors if you are in the habit of making links open in new windows

0 comments
Many Webmasters and bloggers think that in order not to lose visitors, they should make links open in new windows. Others are of the opinion that it is a bad practice as it will discourage visitors from visiting your site again. So I did a sort of a poll (using comments) to find out if people are put off by sites having links open in new windows. See Poll - does making links open in new windows piss you off? (click back button to get back to this page). The majority of those who responded says no. However, it may not be a representative sample as those who responded I assume are all bloggers themself, and may not represent the general population. Also, one said that he prefer links to open in new windows if they lead to other sites, and in the same window if it is on the same site.

After the result of the poll, I have decided to continue my practice of making links open in new windows, but add a comment after the link (close new window to get back to this page), and when I make a link to the same site, add a comment (click back button to get back to this page).

I hope that will help, and also prevent confusion such as visitors having got used to links opening in new windows closing the window when they click a link leading to the same site (which open in the same window).

I hope very much you will leave your comments on what you think of this practice. It will be good for you to know too, as that can influence you on what practice to follow by knowing what other thinks.

NEWER POST    OLDER POST
Continue reading →
Wednesday, September 27, 2006

Editing or creating a link list in the blog sidebar

0 comments
Although I have published posts on how to edit or create link lists in the sidebar, some readers are still having problems. Two readers have contacted me to help them do it step-by-step. So, I thought since this is not difficult, I will do it.

If you use a standard Blogger template, most likely you will have this ready made link list in the sidebar, as shown in the screenshot below:
link list


This link list is caused to be displayed by an <img> tag. You can look for it in the blog template by signing into Dashboard, selecting the blog, click the TEMPLATE tab, and the template editor will open. Below is a screenshot of a part of the template where the <img> tag is located:
link list in Blogger templateIt would be towards the end of the template. The HTML circled in red is the HTML which cause the link list in the first screenshot to be displayed. This is the HTML you are supposed to edit.

Let's say, you want to link to 3 blogs with the following URL's


<a href="http://foodasmedicine.blogspot.com">Natural Remedies</a>
<a href="http://enviromansays.blogspot.com">Enviroman Says</a>
<a href="http://guide-to-malaysia.blogspot.com">Guide to Malaysia</a>


you would have to edit the HTML circled in red in the template so that they become


<h2 class="sidebar-title">Links</h2>
<ul>
<li><a href="http://foodasmedicine.blogspot.com">Natural Remedies</a></li>
<li><a href="http://enviromansays.blogspot.com">Enviroman Says</a></li>
<li><a href="http://guide-to-malaysia.blogspot.com">Guide to Malaysia</a></li>
</ul>


If you wish, you may even change the title Links to something else, like for example My Favourite Sites, so the first line of the above codes become

<h2 class="sidebar-title">My Favourite Sites</h2>

NEWER POST    OLDER POST
Continue reading →
Tuesday, September 26, 2006

How to make links open in new windows

0 comments
Someone asked this question "How to make links open in new windows" in the comments section of this post Does making links open in new windows piss you off?. I thought it a good idea to answer in a post to make it available to more readers.

To make a hyperlink open in a new window, type it this way:
<a href="URL" target="_blank">Description</a>

NEWER POST    OLDER POST
Continue reading →
Monday, August 14, 2006

How to add hyperlinks in the sidebar

0 comments
This post is a result of a request from a reader. There are various ways in which you can add links to your favourite websites in the sidebar. One of the easiest is to just modify the given codes for the links which most standard Blogger templates has. Look in the template, between
<!-- Begin #sidebar -->
<div id="sidebar"><div id="sidebar2">
and
</div></div>
<!-- End #sidebar -->
for the following block of codes in the template.

<MainOrArchivePage>
<h2 class="sidebar-title">Links</h2>
<ul>
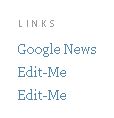
<li><a href="http://news.google.com/">Google News</a></li>
<li><a href="http://help.blogger.com/bin/answer.py?answer=110">
Edit-Me</a></li>
<li><a href="http://help.blogger.com/bin/answer.py?answer=110">
Edit-Me</a></li>
</ul>
</MainOrArchivePage>


What you have to do is to edit the URL and the text to be displayed (in the first link they are respectively http://news.google.com/ (URL) and Google News (text to be displayed). You will have to replace the URL with the URL you want the link to point to, and you will have to replace the text to be displayed with your own text. For example, I want to have 3 hyperlinks to point to the blogs "Blogger for dummies", "Blogger Tips and Tricks" and "Adsense Alert" (these are the texts that will be displayed in the links. The above will have to be edited to

<MainOrArchivePage>
<h2 class="sidebar-title">Links</h2>
<ul>
<li><a href="http://bloggerfordummies.blogspot.com/">Blogger for Dummies</a></li>
<li><a href="http://blogger-tricks.blogspot.com">
Blogger Tips and Tricks</a></li>
<li><a href="http://adsense-alert.blogspot.com">
Adsense Alert</a></li>
</ul>
</MainOrArchivePage>


These hyperlinks will appear in the main (index) page and the archives pages under a heading "Links", but will not appear in the individual post pages (permalink). If you want it to appear also in the individual post pages, you will have to remove the <MainOrArchivePage> and </MainOrArchivePage> tags. Also, you may change the text Links (which you will find in <h2 class="sidebar-title">Links</h2> to anything you want, like changing it to My favourite sites. If you want more links, you can just copy and paste the code for the hyperlinks. Just copy, paste and edit the line of <li><a href="http://news.google.com/">Google News</a></li>

If you want more sections for the links in other parts of your sidebar, you can copy and paste the codes to relevant parts of the template, and then edit them as described. For a guide as to which part of the template to paste them into, refer to the post Blogger template tutorial adding contents to via the template. And if your template doesn't have the codes already in the template (like for example the standared Blogger Sand Dollar template) you can always copy and paste the codes above into your template and then edit it. For a guide as to which part of the template to paste the codes, refer to the post Blogger template tutorial - adding stuff via the template

You can also add hyperlinks in other ways. The above uses unordered list, which leave big space between the links. If you want the list of links to be more compact, you can use the following codes instead:

<h3>Websites I visit</h3>
<a href="url 1">description 1</a><br />
<a href="url 2">description 2</a><br />
<a href="url 3">description 3</a><br />


As before, you can change the text "Websites I visit" to anything you want.

Books from Amazon

The Rational Guide to Google Blogger (Technical accuracy is assured by Biz Stone, Former Senior Specialist on the Google Blogger Team)

Essential Blogging : Selecting and Using Weblog Tools

OLDER POST
NEWER POST    
Continue reading →
Related Posts Plugin for WordPress, Blogger...