Showing posts with label miscellaneous. Show all posts
Friday, May 30, 2008

Peter Chen, King of the Jungle - Samba Leo or Samba Tigris (Panthera)

0 comments
I am going to be King of the Jungle at Nuffnang's Wild ‘Live’ Blogging party which will be powered (sponsored?) by Maxis Broadband (hopefully - places limited). I am going to be Samba Leo, King of the Jungle:


Photo of Samba Leo, King of the Jungle is property of Tambako The Jaguar


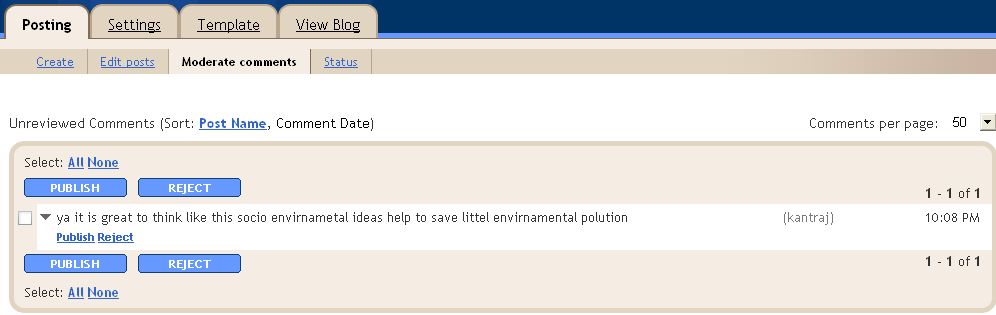
Yeah, I know, the previous post in this blog is Peter Chen is on medical leave (click BACK button to get back to this page). However, I am happy to announce that it was nothing serious. I was just warded in the hospital for observation [low blood sodium (Natrium) level]. I am now out and hoping to clear the more urgent task (of course getting an invite to Nuffnang's Wild ‘Live’ Blogging party is URGENT, so have to make this post plus other tasks before I start approving and responding to comments in this blog. At this point in time, there are 72 comments waiting for publishing:

Comments in Blogger Tips and Tricks waiting for moderation

A thousand apologies to those waiting for their comments to be published and probably for the response too, but becoming King of the Jungle gets a slightly higher priority. But fret not. I will try my best to start working on the comments as soon as possible.

Back to Nuffnang's Wild ‘Live’ Blogging party. To get an invite, hopeful blogger have to upload a clip art. The above is a photo, not exactly clip art. So I am going to upload a clip art of a Tiger's tail? below (clip art supplied by Nuffnang itself, so there will be no grounds for disqualification):

clip art tiger's tail given by Nuffnang
"Clip art" of tiger's tail is property of Nuffnang, Malaysia and Singapore


OK, OK. That is a tiger's tail, not a Lion, King of the Jungle. You see, I am that very cautious type. The title of this post is "Peter Chen, King of the Jungle". According to Wikipedia, "it (lion) is the second-largest living cat after the tiger". Also, "Wild lions currently exist in sub-Saharan Africa and in Asia". So choosing a lion is perhaps not so appropriate for
Nuffnang's Wild ‘Live’ Blogging party as Nuffnang is based in Malaysia and Singapore, both tropical, not sub-Saharan. But, again according to Wikipedia, "(the tiger) is the largest of four "big cats" in the genus Panthera" and is "Native to much of eastern and southern Asia". Malaysia definitely have tigers in its jungles. Not too sure about Singapore though. Singapore, again according to Wikipedia, my favorite source of information, 'the name Singapura comes from the Sanskrit singha ("lion") and pura ("city")'. According to the Malay Annals, this name was given by a 14th century Sumatran prince named Sang Nila Utama, who, landing on the island after a thunderstorm, spotted an auspicious beast on the shore. His chief minister errorneously identified as a 'singha' or lion.[11] However, recent studies of Singapore indicate that lions have never lived there (not even Asiatic lions), and the beast seen by Sang Nila Utama was likely a tiger, most likely the Malayan Tiger. Source: Wikipedia: Singapore.

Now after some "careful researching", Peter Chen is going to be Samba Tigris (tiger) instead of Samba Singa (both of Panthera family), The King of the Jungle. Now, why Samba Singa, you may ask. You want to know? Be at Nuffnang's Wild ‘Live’ Blogging party. If you can't make it to the Nuffnang Wild ‘Live’ Blogging party, fret not, for I may try some 'live' blogging. I may blog 'live' while at the party itself. So bookmark (top, left sidebar'} or subscribe to this blog (somewhere in the middle of the left sidebar after the Amazon ads - 'powered by FeedBlitz'). In the meantime, I hope you will complete the survey powered by Nuffnang, the third last from the bottom of the left sidebar (at time of publishing).

Peter Chen's nice graphic signature
Continue reading →
Saturday, February 16, 2008

Scramble your email address to prevent email from being harvested for spam

0 comments
I previously created a special email address for communications with my readers and used a simple HTML mailto: tag knowing jolly well that the email address will be harvested by robotic programs for spam. However, I used free web-based mail which have very good and free spam filter and practically all spam ends up in the spam folder and very little in the Inbox. Also, the amount of spam I get is not that much. However, I have found out some important email messages have ended up in the spam folder and it is a good thing I make it a habit of checking the spam folder before deleting them.

But Amanda of Blogger Buster have made a very good email link scrambler and rather risk the amount of spam messages I have to check, I thought it wiser to use what Amanda has conveniently provided for us. It is very easy to use. Just type in your email address, type in the text of what you want to be displayed for the link (example "email me", "contact me", "click here to email me", etc., then just click the "Scramble Email" button and the script will be generated for you to copy and paste into HTML/JavaScript Page Element. If you do not know what I am talking about, please refer to Add advertisement, visitor counter, email link, etc. to your blog (click BACK button to get back to this page).

Please note that this will not work if you try to paste the script into a blog post.

Peter Chen's nice graphic signature
Continue reading →
Sunday, February 10, 2008

Expand Blogger post editor window with Netscape Navigator

0 comments
Update 2.20am 19 April 2008: Please note that the ability to widen the normal pathetically tiny Blogger post editor window is not always repeatable. Sometimes, I can do it, sometimes not. I have seen it a few times but this is the first time I made a post about being able to EXPAND (widen and lengthen) the Blogger post editor window with Netscape. There are screen shots and that screen shots are definitely not faked with Adobe Photoshop for this poor Blog*Star only use the free and very good Irfanview plus PC Paint which comes with Windows. This poor Blog*Star cannot afford to buy the expensive Photoshop. Anyone who wants something better than the free Irfanview photo editor can try the open source GIMP. Update posted here to avoid Blog*Star from being called a nut case.


I published a previous post about being able to expand (elongate) the tiny and very inconvenient Blogger post editor window with Netscape Navigator browser at Expand Blogger tiny Blogger post editor window in response to a blogger question in the official Google Blogger Help and a renegade Blog*Star responded with a "Peter, you have blown a fuse. However, after posting the link Expand Blogger tiny Blogger post editor window where there is a screenshot to prove it, he accepted it but said I must have done it while I was in the twilight zone. I did mention that it was not always repeatable, but today, I must be in the twilight zone again, for I did it again in Netscape and here is the screenshot to prove it:

expand tiny Blogger post editor window with Netscape Navigator

The earlier one was done in the first tab of the Netscape Navigator web browser, and when I tried to repeat it in another tab, I couldn't do it. The above was done in the third tab in Netscape Navigator, so most likely the ability to do it does not necessarily depend on which tab you happened to be in.

This post is now being prepared with the Flock social web browser and the Blogger post editor window now cannot be expanded (elongated).

I was told that Blogger itself do not support this "expanding post editor window" but it depends on the browser. I was further told that it can be done with the Safari web browser developed for the MAC computer specifically using the Mac OS X v10.3 operating system. I understand Safari 3 beta is now available for Windows too and at the moment, I am downloading it to test out. Watch out for updates.

Update 15 February 2008: Actually the one and only test with Safari 3 beta for Windows was done some time ago, and the result was a failure. I did not try it again, perhaps another time. But someone commented in this post it can be done. Let's see if he comes back with some kind of screenshots or more information.

Peter Chen's nice graphic signature
Continue reading →
Saturday, July 28, 2007

Displaying HTML tags

0 comments
A blog reader has asked for instruction on displaying HTML tags/codes, especially how to put them in a scroll box. If you try to display
<a href=URL">Description</a>
and you type it exactly as you see it above, what will be displayed is
Description

You will have to refer to How to post special characters. To make it clearer, I used
special code to display HTML tags
to display
<a href=URL">Description</a>

If you have longer blocks to display in a scroll box, you may do what I do. I save the code for the scroll box in a Notepad file and saved it in a folder where I can easily find it when I want. The code for the scroll box I have saved is given in the scroll box below:

<div style="width: 395px; height: 100px; background-color: a0ffff; color: 000000; font-family: arial; font-size: 12px; text-align: left; border: 0px solid 00000; overflow: auto; padding: 4px;"></div>


I have width: 395px; because the width of the main column of the main column (posts) of this blog is 400. height: 100px; I can change to suit what I put inside the scroll box. For example, I edited height: 100px; to height: 40px; for the scroll box above. If you want to find the width of your blog Header, main column, sidebar, refer to How to find the width of your blog Header, main column, sidebar (click BACK button to get back to this page).

Regarding making a scroll box, you should refer to Make a scroll box (click BACK button to get back to this page).

If I type it as you see it above inside the scroll box, you will not see the code for the scroll box as seen above. What I had to do is to change < to code for less than and > to code for greater than

You can do it manually one by one but a smarter way is to put the HTML code you want to display into a Notepad file and use Edit > Replace from the menu bar and let Notepad find and replace all the < and > automatically for you. See screenshot below:

Using Notepad replace function to change special HTML character to code to display on the web

Once you have entered what you want, just press "Replace all" and it will all be done automatically for you. You can then highlight all the edited code and paste it into the scroll box.

To further illustrate, nisha has asked for the HTML for a clickable link to be displayed inside a scroll box. I will first type the HTML code for the hyperlink in Notepad:

original HTML for hyperlink

and then used the method described above to change it to

HTML for hyperlink edited to display on the web

I will then copy-paste the code for a scroll box, and place it inside the scrollbox as explained in the post Make a scroll box (click BACK button to get back to this page). I will then copy all the edited HTML for the hyperlink as shown in the second screenshot for the Notepad and paste it inside the scroll box and I will end up with this:

<a href="http://nishasworld-and-babyalisha.blogspot.com/">her experiences,interests,dreams,family and baby alisha...</a>


I hope this is clear. If you have further question, leave a comment.

RELATED POST:

Scroll box FAQ
Continue reading →
Friday, June 22, 2007

Add Blogger Content to a Website

0 comments
There are frequent requests for ways to add Blogger blog content to a website. Apparently, you can do it if you use FTP to publish the blog to your own site. I use blogspot exclusively for all my blogs and am very happy to continue to do so. I don't need to bother with fee renewals. If for any reasons I can't be around to renew the fees, my blogs will still be on the web, and that to me is a great comfort.

eXpertise of Getting free content for your blog posted a solution at the Google Blogger Help group (a public forum), which since I don't use FTP, I cannot test. However, I will just paste the solution he offered below:

"You can use FTP to publish the blog on your own site. you can also customize the template to look like your own site. there is no need to use the api or any programming language. HTML/CSS/JavaScript is enough. learning the few custom blogger tags can also be helpful. you can see the help file and also seek help here."

If Google had not disabled "reply to author" in all Google groups in which Google employees participate, I would contact him to let him know about this post. Since I can't do that, I will do the next best thing and comment in his post to let him know about this post and the link I put to his post.
Continue reading →
Saturday, June 9, 2007

How to put a donation button on your blog

0 comments
Update 18 July 2007: If you are only interested in how to make a "Donate" button, skip this and go straight to the actual post. I have made a "Donate" button as a demonstration at the bottom of the left sidebar and have made a statement that while it is actually for demonstration I have I am not averse to accepting donations and have said in absolute sincerity that no amount is too small. If you want to use the that button to donate or to test you are free to do so, but please read the updates in red at the bottom of the post. This update is placed here because I added a link back to this post at the Donate button to alert any potential user of that "Donate" button of the implications after a kind soul donated $0.05 which I can say with absolute sincerity is greatly appreciated, but in my accounts, it says that I have been credited with $0.00 (because Paypal takes a cut from the donation). So the kind donor has lost $0.05 while I have gained $0.00 and Paypal earned $0.05. I remembered contacting Paypal for a schedule of charges but don't remember getting a response. I will contact them again. For a fuller description, read the update at the bottom of the post.

Another note: If you sign up for a Paypal account, you will be asked to pay a verification fee of something like $1.95. This verification fee will be credited back to your account when you make a withdrawal, so it is not really a "fee". Note that you can chose to verify later or not verify at all, in which case the maximum amount you can withdraw from your account will be limited to $1000.


How to add Paypal donate button


This is in response to someone's question regarding putting a donation button on a blog. The easiest way is to sign up for a Paypal account (to get to their site, type "paypal" into the searchbox at the top of the page, tick the "Web" radio button and click "Search"). Sign into your Paypal account. Once you are signed in, you will see a Merchant Tool Paypal Merchant Tool tab tab. Click that and you will get to a page, on the right side of which you will see a section titled "Key Features".

Paypal merchant tools key features

Click on "Donations" and you will get to a page where you have various fields to fill in. One of them is "Donation Name/Services". I typed "This is for demonstration purpose only ...." thinking it will be added to the top of the button, but it looks like it serve no purpose because I left the other fields empty (except for my country which is already selected in the drop-down menu), left my choice of button as the default "donation" button Paypal make a donation button ticked, click "Create Button Now" at the bottom of the page. The HTML was generated. I just copied the HTML, got to the LAYOUT of the relevant blog, click Add a Page Element, Update: Page Element has been renamed as GADGET so don't go crazy if you cannot find "Page Element") chose HTML/Javascript, paste the HTML into the box and click "Save to Blog". That Page Element was added to the top of the left sidebar section. I wanted it at the bottom so I dragged it down, then click "Save" at the top of the LAYOUT.

I click "View Blog" and didn't "This is for demonstration..." so I had to edit the Page Element and added that to the Title. I will be writing to Paypal for the purpose of those fields and will update this post when I get a response.

If you want a different button from the Paypal Paypal make a donation button button, you will have to create your own button, perhaps using one of those free button generator sites (use the searchbox at the top of the page. Tick the "Web" radio button). Upload it to the web using either Getting New Blogger to host a picture for the profile photo, sidebar, Header, etc. (click BACK button to get back to this page) or use Photobucket. Get the URL, paste that into the field for the Button Image URL and tick the radio button.

Update July 8 2007: Got an email notification from Paypal saying I received a payment for USD0.05, showing that the "Donate" button is working.

Paypal payment received email notification

As I have said in the title for the donate button, it is for demonstration purposes and no amount is too small if you really want to donate, and I mean it. I really appreciate the person who made that donation. However, note that Paypal deduct their fees when they pay me, although there is no fee when you make a payment (eg. via a "Donate" button.) and this is what shows in my account:

Paypal payment details

Click on screenshot to enlarge it, or if you don't want to and can't read the figures, I received $0.00 after deduction.

So while I sincerely appreciate the payment, note that after deduction, I got $0.00, the kind donor lost $0.05 while Paypal got $0.05. I still appreciate the thoughts though, but I will try to get more information about deduction from payment received so that you are better informed if you want to put a similar "Donate" button in your blog and will update this post when I receive a response. For personal experience, read below.


Note: I have made a payment of -$619.00 USD from my balance to a US resident. While there was no charge for making the payment, the recipient told me she only received only $595.00, meaning $23 (3.7%) had been deducted.

Also, if you do not already have a Paypal account and you started one and use your credit card for verification purposes, there will be request for a verification fee of I think is $1.95, which you can chose not to pay. In that case, your payment from Paypal will be limited to USD1000. I have made that verification payment recently, but that payment will be paid back into my account when I next make another payment so I wouldn't really lose anything.

The person who made the donation also requested a payment of $0.01 CAD, probably for a contribution to the verification fee. I appreciate his thought on making that donation and really don't mind making that payment, but I will have to inform him that if I make that payment, after Paypal deduction, he will probably get $0.00 CAD.
Continue reading →
Monday, June 4, 2007

Video chat for your blog

0 comments
video chat for your blogI have put an example of a video chat into the left sidebar of this blog Blogging Ideas. It is near the bottom of the first left sidebar, just above the clock. You can leave a message by clicking on "Click here to leave a video message" and if you have a microphone and a webcam on your camera (I have both) and I happened to be online and signed in, we will be able to have a live video chat. However, don't expect too much from me because I am not really interested in having video chat and that has been put there for demonstration only.

I haven't really tested WengoVisio, but I think if you leave a video message when I am not signed in, I will probably receive an email notification of the video message with a link to the message which I would be able to view at time I chose. I just received such a email notification and had thought of posting the link to that message, but had second thoughts as it may be an invasion of privacy.

If you are interested in installing such a video chat for your blog, register at WengoVisio, sign in and get the script to add into a HTML/Javascript Page Element of the LAYOUT of your blog. If you are not familiar with that, refer to Adding advertisements, hit counters, etc. to your New Blogger blog (click BACK button to get back to this page).
Continue reading →
Wednesday, April 25, 2007

Countdown clock for your blog

0 comments

Here is an example of a post which have a countdown clock with post title Countdown to Malaysia Vision 2020. I made it in response to a request from a member of the Google Blogger Help group. I thought I might as well make a post out of it so that more people will know about it.

You can generate the script for free from A free countdown clock for your Website. You choose the type of clock you want ("countdown to a date in the future" or "Time elapsed since date in the past"). You can set the year, month and day you want to countdown to. The default for hour, minute and second is set to 0,0,0, but you can set them to any figure you want. You choose the countdown mode (see Countdown clock help page. The is also a choice of 17 languages for the countdown clock. Choose the background color (HTML color code), text color and whether you want a border or not. For choosing a background color to match the colors of your site the following will be useful:
ColorPic and
Color Blender.

You are then ready to generate the script to paste into your post, or generate a link to the clock if you don't want the countdown clock on your site. You can also add it to the sidebar by pasting into a HTML/Javascript Page Element (click Add a Page Element in the LAYOUT). Page Element is now referred to as Gadget. You may have to do some adjustment to the dimensions of the countdown clock in this case. Later, I will probably do a demonstration and write more about it.
Continue reading →
Thursday, March 8, 2007

Cannot see toolbar in post editor. What to do?

0 comments
There are frequent complaints of bloggers using the Blogger platform for their blogs not being able to see the toolbar (containing the tool icons for making text bold or italic, for making a hyperlink, for spell checking, and for uploading photos) and/or cannot see the EDIT HTML/COMPOSE tabs in the post editor.

This too has happened to me before, and what I do is to use a different browser (see What to do when you can't publish post, upload photos, log-in, etc. and Why you should be using more than one browser (click "BACK" button to get back to this page).

Other things you can try is to refresh the page, clear cache and cookies or press Ctrl + F5 keys.
Continue reading →
Thursday, March 1, 2007

What to do when you cannot see the graphic text for word verification

0 comments
In your blogging life, you will come across many situations where you have to complete word verification (typing in the text you see in a graphic) to publish, comment, etc. There will be some frustrating time when the graphic text is not visible. I have come across this situations a couple of times before, and just leaving the text field empty, and clicking publish, review, publish or submit will cause the page to refresh and the graphic text to appear. Today, I tried to comment on a blog. I tried that trick numerous times, and the graphic text just refused to appear.

This time, I cleared the cache and cookies (I usually am a bit reluctant to do this as in many things, I have to start from fresh again), and sure enough, the graphic text appeared. The only problem was I had to sign in again to publish the comment.

Unfortunately, I can't remember if I used my usual strategy of changing browser. If changing browser can help, I would have preferred to change browser as then I don't have to go through the hassle of clearing cache and cookies, and having to sign in again, etc.
Continue reading →
Monday, February 5, 2007

How to get indent for your post paragraph

0 comments
This question crops up farely frequently in the Google Blogger Help group, so I am writing a post to explain how it is done.

First, backup your template.

If you are using an old classic Blogger template, add the following style script to your template immediately after the <style> tag:

p {
text-indent: 20px
}

If you are using the New (formerly beta) Blogger template, you will have to add the above script below the <b:skin> tag, or better still add it just above the following block of codes:

body {
background:$bgcolor;
margin:0;
color:$textcolor;
font:x-small Georgia Serif;
font-size/* */:/**/small;
font-size: /**/small;
text-align: center;
}

Save the template.

Now whenever you want your paragraph to be indented, you have to type your text between the <p> and </p> tags, that is, start the paragraph with a <p> tag and end it with a </p>.

See this post for an example of a post with indented paragraphs: Quick tips on how to draw a realistic face

UPDATE: 11 April 2007: A reader has commented on difficulties in implementing the hack above, and asked for alternative. I have published an alternative way to indent your paragraphs at Another way to indent your paragraphs (click "BACK" button to get back to this page).
Continue reading →
Friday, February 2, 2007

Old Classic Blogger or New Blogger (formerly beta) account

0 comments
Here is one way to tell if a blog is still using the old classic Blogger account or the New Blogger (formerly beta) account is to look at the navbar at the top of the blog. If it is the New Blogger account, the left part of the navbar should look like this:
New Blogger (formerly beta) navbar
If you see anything different from the above screenshot, then it is still using the old classic Blogger account.
Continue reading →
Friday, January 12, 2007

Ways to enable your readers to contact you

0 comments
If you want to interact with your readers, there are various ways, one of which is via the comment system. However, some may want to enable their readers to email them, like I do. The standard way to do so is by using the HTML mailto link like this:

<a href="mailto:email address">Click here to eMail Me</a>

However, some people do not like that because that email address you put in the link can be harvested by robotic programs for spam. However, I have created a Gmail address specially for this purpose, and used the links for my blogs, and it has worked OK so far. I do get spam, but Gmail spam filter is very good and practically all ended up in the spam filter and only an occasional few get through which is simply dealt with by deleting.

There are also other ways for you to let your readers reach you. One of them is showing your email address in your profile. Another way to to generate a graphic that shows your email address either by yourself with a graphic program, or to use email graphic generators like E-Mail Icon Generator which can generate a graphic such as this one: graphic email text to hide email address from email address harvester. In this case, your reader will have to manually type in the email address into their compose window of their email program. In this way, your email address will be visible to your readers who can read the graphic, but the email address will be hidden to the email harvesters as they cannot read graphic. You can see an example of this in the blog Site Promotion Tips. It is at the bottom of the right sidebar, below the Profile.

To put this in your blog, if you are using the New Blogger template, get into Layout, click "Add a Page Element", in the pop-up, select "HTML/Javascript> and paste the script generated as described above into the box, and add a title like "My Email address". If you are using the old template, you will have to add the script direct into the template. As a guide to where to paste your script, see post Blogger template tutorial: Adding content via the template (click "BACK" button to get back to this page).


  NEWER POST    HOME  OLDER POST
Continue reading →
Sunday, January 7, 2007

Newer Article link, Home link, Older Article link, at bottom of every post

0 comments
I did a post How to have Previous and Next links at the bottom of every posts. Actually it should be titled "How to have NEWER POST, HOME, OLDER POST links at the bottom of the post" as that is what I have decided to do for this blog.

I have decided to redo the post for the following reasons"

1. I used tables for this blog. A reader commented he didn't like tables
2. Another reader asked how she can have the title of the posts rather than NEWER POST and OLDER POST in the links. It is very hard to answer in the comments, so I promised to answer in a new post.
3. I did not describe how I easily obtained the links to put in the codes for the links.
4. old (classic) Blogger is being phased out, and is being replaced by the New Blogger (formerly beta) blogs. This will be good for those without any HTML knowledge and don't want to tangle with it. However, I am betting that there will be a few die-hards who will want to stick to the old (classic) template, as with a little HTML knowledge, it is easier to have better control over the "look and feel" of the blog. This hack, for example, will be with 2 types of links in the new Blogger. The links as a result of this hack and the NEWER POST | HOME | OLDER POST that is automatically put there by the New Blogger.

So here I am doing a new post. First, look at the result of what I will be describing in this post: The Mayo Clinic diet and the 7 rules of dieting. You will see both what we are trying to achieve in this post (at the bottom of the post) and what is put there automatically (NEWER POST | HOME | OLDER POST at the bottom of the comments (That is a New Blogger Blog). Click on the links and see how it works.

Method

If that is what you want, this is what you need to do. Sign into Dashboard, select the blog, click SETTINGS > FORMATTING, then at the bottom of the page, in the box for the Post Template, add this into the box:

<a href="Newer Article URL">Newer Article title</a>special character for HTML non-breaking space|special character for HTML non-breaking space<a href="Main page URL">Home</a>special character for HTML non-breaking space|special character for HTML non-breaking space<a href="Older Article URL">Older Article title</a>


Note that special character for HTML non-breaking space is an image, not a text, so if you are copying the codes from the box above, you will have to manually type in the character, which is the HTML for a non-breaking space to put some space between the links. Now each time you create a post, the codes will be included in your post, and you have to do is to substitute the New Article URL with the actual URL of the new article, the Main Page URL with the actual URL of your main page (this is better done in the post template, so that you don't have to do it each time you do a new post), the Older Article URL with the actual URL of the older article, and the Title of the Older Article with the actual article of the older article.

How to get the URL's and the titles

I would suggest that if you do not already have FireFox browser installed in your computer, you download it from this site: FireFox Alert or direct from this blog by clicking on the "Get FireFox with Google toolbar for better browsing" link at the top of the right sidebar. This is because FireFox has tabbed browsing and will help you greatly in this task.

Now when you modify the codes given in the above box, you will need the post URL and title. The easiest way to do this is the following. Assuming you are still in the post editor and using the FireFox browser, middle click on the EDIT POST tab at the post editor (or right-click and select "Open in New Tab"). A list of all your post will appear in the new tab in the same window. To get the URL of the relevant post, right-click on the VIEW link and select "Copy Link Location", then go back to the post editor tab, and paste the URL in the relevant place. Regarding the post article title, you can either refer to the title in the list of posts and manually type in the post title, or if you want to copy-paste, right-click on the VIEW link and choose "open in new tab", then in the new tab, just highlight the title, return to the post editor tab and paste in the post article you have copied.

Since in your previous post, you don't have a NEWER POST and likely didn't put in the link for the latest post, click EDIT POST and the list of post including your latest post will appear. Right click on the VIEW tab against your latest post, click EDIT against the previous post, then add in the link (and also add in the new title) in the post editor, then publish.

If you already have a lot of posts, and you want to do it for each post, then copy the above code, substitude the Home URL with the actual url of your main page, then copy again. This is so that you don't have to do it in each post. Click EDIT against those old posts you want to add the link, , paste the modified codes at the bottom of the post and repeat the process described above.

Now if you understand what is going on, you will be able to modify my instruction to do whatever you want done. If you still have questions, put them in the comments and I will try my best to answer.

  NEWER POST    HOME  OLDER POST
Continue reading →
Thursday, January 4, 2007

How to change language if you are an expat in a foreign country

0 comments
There have been complaints of people whose mother tongue is, for example, English, but is living in a foreign country, eg. Japan. When they log into their Blogger Dashboard, it is all in that foreign language and they have problems understanding it. For such cases, it is easy to change the language even if you are living in a foreign country. Sign into Dashboard, then at the top right hand corner of the Dashboard is this:

new EDIT PROFILE with drop-down menu for language choices

Right at the bottom is a section "Language" with a drop-down menu. Click the down arrow and a long lists of available languages will be shown. Selectg your preferred language and your preferred language will automatically be saved.

Amazon products for languages

There is also another setting you can do. In the Dashboard, for the relevant blog, click SETTINGS, then click the FORMATTING sub-tab. Somewhere in the middle of the page will be a drop-down menu to set the language for the blog:

FORMATTING SETTING  language drop-down menu

Click the down arrow and select your preferred language. Then at the bottom of the page, click "Save settings".

Amazon products for expatriate

If that still didn't get the effect you want, you may have to change the language option of your browser.

For FireFox, in the menu bar at the top of the browser, click TOOLS > OPTIONS and in the pop up, click the "Advanced" tab . Then in the "Languages" section, click "Chose":

Firefox Tools Options Advanced Languages Chose

In the second section which is a drop-down menu for "Select a language to add...", click the down arrow and select your preferred language. Once you select the language, the "Add" button will become active. Click that. The rest, I have never tried because I have no need to change the preferred language of my browser, and you are on your own from there.

BTW, if you are like the majority of surfers who only have Internet Explorer, you should seriously consider getting the FireFox browser. I would highly recommend it, and if you go to FireFox with Google toolbar, you will see a screenshot of a section of a page from Blogger Help where Blogger recommend Firefox.


  NEWER POST    HOME  OLDER POST
Continue reading →
Friday, December 29, 2006

New Blogger (formerly beta): How to jump the queue

0 comments
There are blogges still using the old Blogger (classic) account who are keen to switch but have not receive any invitation to do so. In my case, I am waiting till the last minute. For braver souls who are impatient to switch, here is what you can do. Go to Blogger sign in page and you will see a message "Switch now". See screenshot below:

new Blogger (beta) switch now option

Click "Switch Now" and follow instructions. And good luck to you.

Update: Just as a test, I tried, and received this message

"Could not switch you to the new Blogger

Thanks for your interest in the new version of Blogger! Unfortunately, we cannot switch your Blogger account at this time, because one or more of your blogs cannot be moved. Please see our help article for more information."

Google Blogger Sign in pageUpdate 7 April 2007: This is what I see when I am not signed into any Google account and go to http://www.blogger.com. The migrate now is no longer there. I believe the way to migrate now would be first to sign up or sign in to a Google account, then go to http://www.blogger.com. Unfortunately, I have migrated all my old classic Blogger account to the New Blogger account, and I have no way of testing that.

  NEWER POST    HOME  OLDER POST
Continue reading →
Sunday, December 24, 2006

Why you should not delete your blog and what you should do if you change the URL of your blog

0 comments
Just read this complaint from another blogger who deleted his blog: "After I delete my old blog angelchen1111.blogspot.com, somebody took it over immediately to spam!!! I asked blogger support to do something about it like two days ago, but still no response.... ".

This a a very common problem so although Chuck has written about it here: Warning: Do not delete your blog (close new window/tab to get back to this page), I think that by writing another post of the insidious problem, more people will (and should) know about it.

If your blog has been on the Web for some time, it probably has been indexed by search engines and have a non-zero PageRank. See What is PageRank and how you can easily get it (close new window/tab to get back to this page). So your URL has value to spammers. They will grab the URL for their spamming purposes when you make it available by deleting it, by changing the URL or by changing to hosting it on your own domain via FTP. Some even use it for putting porn on it. This can be very embarrassing for you if you have been giving the URL to your family, relatives, friends, colleague, etc.

What you should do when you don't want your blog on the Web anymore is to delete all your posts and then wait for the cached copies of your blog to disappear from the Web (this may take some time). If you change the URL of your blog, you should immediately try to claim it back, and if you succeed, do a redirect to your new URL. Look at this post on how to do a redirect: How to redirect from old URL to new URL (close new window/tab to get back to this page). That is for blogs using old classic Blogger template. If you are using New Blogger template, refer to Redirecting New Blogger blog to another site (click BACK button to get back to this page).

Chuck mentioned making a "stub" post (which he described as a post of no value. something like "This blog has been moved" or something like that), but I think all that is necessary is to delete all the posts. If you do make the "stub" post, I suggest you remove your profile.

If after reading this post you still want to delete your blog, this is the way to do it.
Sign into Dashboard
Select the blog
Click the SETTINGS > BASIC tabs
Right at the bottom of the page, click "Delete This Blog"
Then don't blame me if you see unpleasant stuff at your old blog address.

  NEWER POST    HOME  OLDER POST
Continue reading →
Monday, December 4, 2006

Blogger Beta: How to add AdSense or permanent Sticky Post at the top of the main column

0 comments
In the standard Blogger Beta templates and also Ramani's 3 column beta template, there is no provision for putting AdSense ads at the top of the main column. You can make a sticky post (close new window/tab to get back to this page) by playing around with the date/time. However, the disadvantage of this method is that it does not last forever. When the "post dated" date is reach, you will have to post date it again. This will change the URL of the post, and that means dead links and starting all over again with search engines for that post. Update: Blogger now no longer changes individual post page URL (permalink, so now you can change the dates, post-date it as many times as you want, no problem.


Here is a method to put AdSense ad at the top of the main column (see Business, Travel and Leisure (close new window/tab to return to this page), or to make a permanent "sticky post" that will remain forever at the top of main page and all other pages of the blog. See blog Motivation and Self Improvements (close new window.tab to return to this page). In that blog, try clicking on the topics in CATEGORIES or the ARCHIVES in the sidebar and observe what is present at the top of the main column.

Here are more examples:

Guide to Malaysia where I have put a searchbar at the top of every page of the blog.

Dummies Guide to Google Blogger where I have added a searchbar as well as a link to the homepage on top of every page of the blog.

Adding a "Add a Page Element" widget to the main column

Sign into Dashboard, and in the relvant blog, click LAYOUT, then click EDIT HTML. In the Template Editor, look for this block of codes:
<div id='main-wrapper'>
<b:section class='main' id='main' showaddelement='no'>
<b:widget id='HTML10' locked='false' title='' type='HTML'/>
<b:widget id='Blog1' locked='false' title='Blog Posts' type='Blog'/>
</b:section>
</div>

Look particularly for showaddelement='no' and change it to showaddelement='yes', then save the template. Click "Page Elements" to get to the LAYOUT and observe that an additional "Add a Page Element" have been added to the top of "BLOG POSTS".

To add Adsense, generate the Adsense script from your Adsense account (in my example above, I have chosen the "Large rectangle" format) to the top of every page of the main colum, click the extra "Add a Page Element, then in the pop-up, select HTML/Javascript, click "Add to blog", then paste the Adsense script into the box and click "Save changes".

To make a "sticky post", after clicking "Add a Page Element", select TEXT instead and click "Add to blog. Then type in your text into the box. To avoid the text running into the sidebar, you will have to use the return key when you come to the edge of the box.


  NEWER POST    HOME  OLDER POST
Continue reading →
Saturday, December 2, 2006

Problem in moderating via Blogger Dashboard still not resolved

0 comments
I have made 2 posts regarding Blogger comment moderation (click "BACK" button to get back to this page):
Bug in moderating comments via email
Advice to Blogger bloggers regarding comments, comment moderation and sidebar problems

If you want to moderate comments, currently, my opinion is it is best to moderate via email notification by signing into your Blogger account, selecting the blog, and click on the SETTINGS > COMMENTS tabs, then in the "Enable comment moderation" field, tick the radio button for "yes" and type in a valid email address (see screenshot below. Click to enlarge):

Blogger setting to enable comment moderation
If you leave the field for the email address blank, you can only moderate via the Dashboard, and in this case, there is currently no way for you to know in which post that comment was made as you can see in the screenshot below (click to enlarge):

moderating comments via the Blogger Dashboard
This will make responding to the comment difficult. This apply to both Blogger classic as well as Blogger beta.

As stated in the posts in the links above, I have brought to the attention of Blogger Support that for those electing to moderate via email notification, some comments don't get any email notifications, and have also made a suggestion to enable bloggers to tell in which post the comment was made when moderating via the Dashboard. Looks like this has still not been done. Some comments don't get email notification and you will have to occassionally check for comments in the Dashboard. I will notify them again of this problem and the suggestion, and I hope you do too. I have done it here: Features and suggestions (close new window to get back to this page). To make it easier for you, maybe you can just copy and paste it in the suggestion field: "When moderating a comment via the Dashboard, please provide a link to the post where the comment was posted. Some comments don't get email notification and the above problem make it difficult for us to respond to a comment."

  NEWER POST    HOME  OLDER POST
Continue reading →
Friday, December 1, 2006

Blogger Beta: How to get rid of those irritating editing icon

0 comments
NOTE: A reader has complained very bitterly about having those quick editing icons in his private blog. If you want to permanently remove them, skip the rest of the post and refer to the link at the bottom of the post.


From a post in the Google Blogger Help group: "Why do the editing tools show up in each section of my blog when I'm not doing any editing?? They keep doing that....I have done everything I can think of to get rid of them but they are still there!!!"

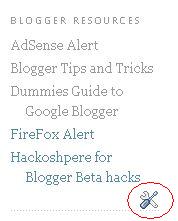
He is referring to those wrench and screwdriver icon you see in the screenshot below:
Blogger Beta editing icon

You will see this in your blogs when you are logged into your Blogger Beta account. To most people, they look ugly, and that is why we are getting so many beta bloggers complaining in the Blogger Help group.

They are meant to be a convenience for beta bloggers to easily edit their blogs. These icons will not be visible to other surfers or even to you when you are logged out of the Blogger Beta account. You need not be worried that your blog will look this way (ugly) to other surfers as they will not see it.

So the answer to the question is, if you really don't want to see the icons on your blogs, make sure you are not logged into you Blogger beta account.

Someone with a private blog have complained very bitterly about seeing those quick editing icons in his private blog. If you want to remove them PERMENTLY, the instructions are at Permanently remove quick editing icons in New Blogger blog


  NEWER POST    HOME  OLDER POST
Continue reading →
Related Posts Plugin for WordPress, Blogger...